SpringCloud 整合 OSS 对象存储
约 1956 字大约 7 分钟...
整合OSS对象存储
一、缘起
文件上传在系统中用的很频繁,所以我们需要将上传的文件进行存储,传统的将文件上传到本机已不适用分布式系统。自己搭建文件服务器有复杂性和维护成本。所以我们可以采用市面上成熟的文件存储服务,如阿里云的OSS对象存储服务。

每个 OSS 的用户都会用到上传服务。Web 端常见的上传方法是用户在浏览器或 APP 端上传文件到应用服务器,应用服务器再把文件上传到 OSS。具体流程如下图所示。
和数据直传到 OSS 相比,以上方法有三个缺点:
- 上传慢:用户数据需先上传到应用服务器,之后再上传到OSS。网络传输时间比直传到OSS多一倍。如果用户数据不通过应用服务器中转,而是直传到OSS,速度将大大提升。而且OSS采用BGP带宽,能保证各地各运营商之间的传输速度。
- 扩展性差:如果后续用户多了,应用服务器会成为瓶颈。
- 费用高:需要准备多台应用服务器。由于OSS上传流量是免费的,如果数据直传到OSS,不通过应用服务器,那么将能省下几台应用服务器。
二、技术方案
服务端签名后直传
背景
采用JavaScript客户端直接签名(参见JavaScript客户端签名直传)时,AccessKeyID和AcessKeySecret会暴露在前端页面,因此存在严重的安全隐患。因此,OSS提供了服务端签名后直传的方案。
原理介绍

服务端签名后直传的原理如下:
- 用户发送上传Policy请求到应用服务器。
- 应用服务器返回上传Policy和签名给用户。
- 用户直接上传数据到OSS。
三、实现案例
1.开通阿里云OSS

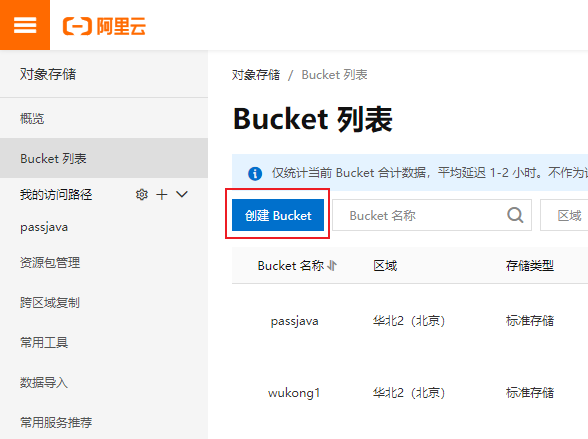
创建Bucket 存储桶

创建Bucket 存储桶 获取accesskey id和secret


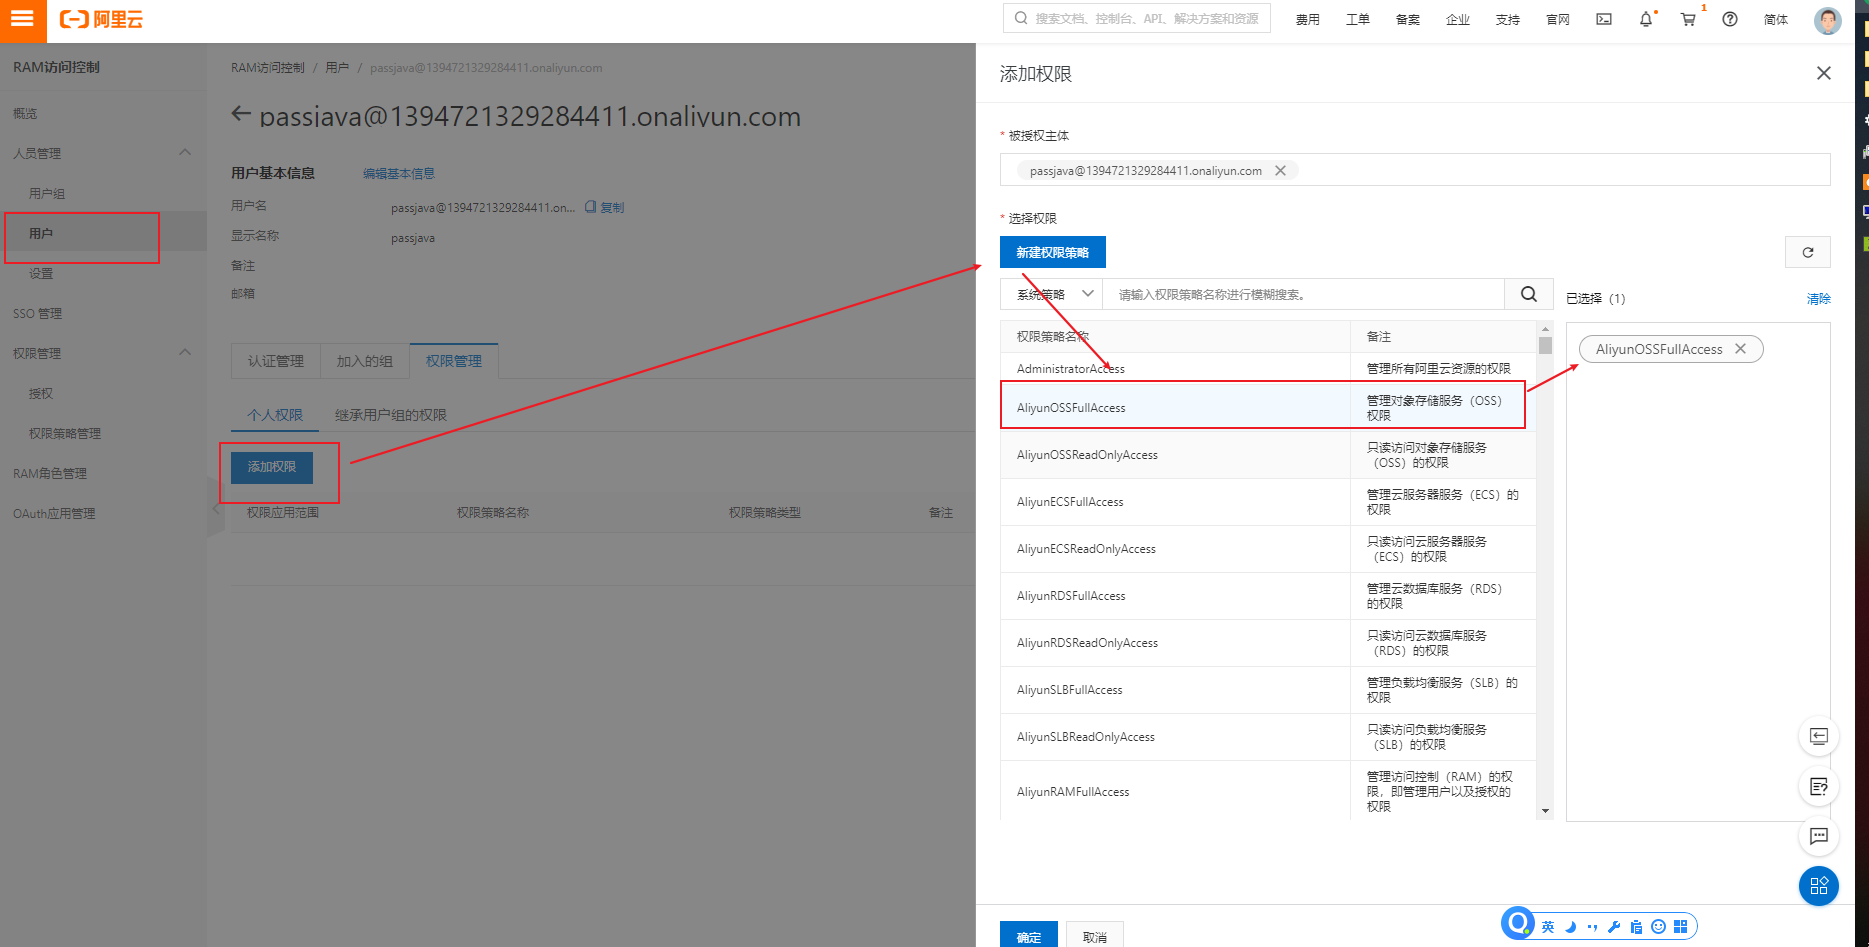
分配权限
分配 管理对象存储服务(OSS)权限

分配权限
2.使用OSS SDK
1) 安装SDK
在Maven项目中加入依赖项
https://help.aliyun.com/document_detail/32009.html?spm=a2c4g.11186623.6.769.2c5145dc4TUgTa
<dependency>
    <groupId>com.aliyun.oss</groupId>
    <artifactId>aliyun-sdk-oss</artifactId>
    <version>3.8.0</version>
</dependency>
2) 上传文件到OSS
@Test
void testUploadByOss() throws FileNotFoundException {
    // Endpoint以杭州为例,其它Region请按实际情况填写。
    String endpoint = "http://oss-cn-beijing.aliyuncs.com";
    // 阿里云主账号AccessKey拥有所有API的访问权限,风险很高。强烈建议您创建并使用RAM账号进行API访问或日常运维,请登录 https://ram.console.aliyun.com 创建RAM账号。
    String accessKeyId = "xxxx";
    String accessKeySecret = "xxxx";
    String bucketName = "passjava";

    // <yourObjectName>上传文件到OSS时需要指定包含文件后缀在内的完整路径,例如abc/efg/123.jpg。
    String localFile = "C:\\Users\\Administrator\\Pictures\\coding_java.png";
    String fileKeyName = "coding_java.png";
    // 创建OSSClient实例。
    OSS ossClient = new OSSClientBuilder().build(endpoint, accessKeyId, accessKeySecret);

    InputStream inputStream = new FileInputStream(localFile);
    ossClient.putObject(bucketName, fileKeyName, inputStream);

    // 关闭OSSClient。
    ossClient.shutdown();
}
3.整合Spring Cloud Alicloud OSS
1) passjava-common项目引入spring-cloud-starter-alicloud-oss依赖
<dependency>
    <groupId>com.alibaba.cloud</groupId>
    <artifactId>spring-cloud-starter-alicloud-oss</artifactId>
</dependency>
2) 配置alicloud oss
spring:
  cloud:
    alicloud:
      access-key: xxxx
      secret-key: xxxx
      oss:
        endpoint: oss-cn-beijing.aliyuncs.com
3)测试上传
@Autowired
OSSClient ossClient;

@Test
void testUploadByAlicloudOss() throws FileNotFoundException {
    String bucketName = "passjava";
    String localFile = "C:\\Users\\Administrator\\Pictures\\coding_java.png";
    String fileKeyName = "coding_java.png";
    InputStream inputStream = new FileInputStream(localFile);
    ossClient.putObject(bucketName, fileKeyName, inputStream);
    ossClient.shutdown();
}

4.获取服务端签名
4.1 准备工作:
- 创建一个第三方服务passjava-thirdparty
- 引入passjava-common模块,并且排除mybatis-plus依赖
<dependency>
    <groupId>com.jackson0714.passjava</groupId>
    <artifactId>passjava-common</artifactId>
    <version>0.0.1-SNAPSHOT</version>
    <exclusions>
        <exclusion>
            <groupId>com.baomidou</groupId>
            <artifactId>mybatis-plus-boot-starter</artifactId>
        </exclusion>
    </exclusions>
</dependency>
- 配置服务发现和端口
spring:
  cloud:
    nacos:
      discovery:
        server-addr: 127.0.0.1:8848
  application:
        name: passjava-thirdparty
server:
  port: 14000
- 配置配置中心
spring.application.name=passjava-thirdparty
spring.cloud.nacos.config.server-addr=127.0.0.1:8848
spring.cloud.nacos.config.namespace=passjava-thirdparty

spring.cloud.nacos.config.extension-configs[0].data-id=oss.yml
spring.cloud.nacos.config.extension-configs[0].group=DEFAULT_GROUP
spring.cloud.nacos.config.extension-configs[0].refresh=true
- 配置Nacos命名空间和oss.yml
spring:
  cloud:
    alicloud:
      oss:
        endpoint: oss-cn-beijing.aliyuncs.com

- 开启服务发现
@EnableDiscoveryClient
@EnableDiscoveryClient
@SpringBootApplication
public class PassjavaThirdpartyApplication {
    public static void main(String[] args) {
        SpringApplication.run(PassjavaThirdpartyApplication.class, args);
    }
}
4.2 获取签名类
@RestController
@RequestMapping("/thirdparty/v1/admin/oss")
public class OssController {

    // @Autowired 或 @Resource 注解
    @Autowired
    OSS ossClient;

    // @Value 注解或 @NacosValue
    @Value("${spring.cloud.alicloud.access-key}")
    private String accessId;

    // @Value 注解或 @NacosValue
    @Value("${spring.cloud.alicloud.secret-key}")
    private String accessKey;

    // @Value 注解或 @NacosValue
    @Value("${spring.cloud.alicloud.oss.endpoint}")
    private String endpoint;

    // @Value 注解或 @NacosValue
    @Value("${spring.cloud.alicloud.oss.bucket}")
    private String bucket;

    @RequestMapping("/getPolicy")
    public Map<String, String> getPolicy() {
        String host = "https://" + bucket + "." + endpoint; // host的格式为 bucketname.endpoint
        // callbackUrl为 上传回调服务器的URL,请将下面的IP和Port配置为您自己的真实信息。
        // String callbackUrl = "http://88.88.88.88:8888";
        String formatDate = new SimpleDateFormat("yyyy-MM-dd").format(new Date());
        String dir = formatDate + "/"; // 用户上传文件时指定的前缀。

        Map<String, String> respMap = new LinkedHashMap<String, String>();

        try {
            long expireTime = 30;
            long expireEndTime = System.currentTimeMillis() + expireTime * 1000;
            Date expiration = new Date(expireEndTime);
            PolicyConditions policyConds = new PolicyConditions();
            policyConds.addConditionItem(PolicyConditions.COND_CONTENT_LENGTH_RANGE, 0, 1048576000);
            policyConds.addConditionItem(MatchMode.StartWith, PolicyConditions.COND_KEY, dir);

            String postPolicy = ossClient.generatePostPolicy(expiration, policyConds);
            byte[] binaryData = postPolicy.getBytes("utf-8");
            String encodedPolicy = BinaryUtil.toBase64String(binaryData);
            String postSignature = ossClient.calculatePostSignature(postPolicy);


            respMap.put("accessid", accessId);
            respMap.put("policy", encodedPolicy);
            respMap.put("signature", postSignature);
            respMap.put("dir", dir);
            respMap.put("host", host);
            respMap.put("expire", String.valueOf(expireEndTime / 1000));


        } catch (Exception e) {
            // Assert.fail(e.getMessage());
            System.out.println(e.getMessage());
        } finally {
            ossClient.shutdown();
        }

        return respMap;
    }
}
测试接口
http://localhost:14000/api/thirdparty/v1/admin/oss/getPolicy
{

	"policy": "eyJleHBpcmF0aW9uIjoiMjAyMC0wNC0yOFQwMjozMzowNy42NzNaIiwiY29uZGl0aW9ucyI6W1siY29udGVudC1sZW5ndGgtcmFuZ2UiLDAsMTA0ODU3NjAwMF0sWyJzdGFydHMtd2l0aCIsIiRrZXkiLCIyMDIwLTA0LTI4LyJdXX0=",
	"signature": "pfn4cggFTMMNqTs+qUnDN5c+k5M=",
	"dir": "2020-04-28/",
	"host": "https://passjava.oss-cn-beijing.aliyuncs.com",
	"expire": "1588041187"
}
4.3 配置网关路由
因为前端页面配置的统一访问路径是http://localhost:8060/api/,所以需要将访问thirdparty的服务通过网关路由到thirdparty服务
将请求
http://localhost:8060/api/thirdparty/v1/admin/oss/getPolicy
转发到
http://localhost:14000/api/thirdparty/v1/admin/oss/getPolicy
配置网关:
spring:
  cloud:
    gateway:
      routes:
        - id: route_thirdparty # 题目微服务路由规则
          uri: lb://passjava-thirdparty # 负载均衡,将请求转发到注册中心注册的assjava-thirdparty服务
          predicates: # 断言
            - Path=/api/thirdparty/** # 如果前端请求路径包含 api/thirdparty,则应用这条路由规则
          filters: #过滤器
            - RewritePath=/api/(?<segment>.*),/$\{segment} # 将跳转路径中包含的api替换成空
测试可以上传成功
4.4 配置跨域访问
配置跨域访问,所有post请求都可以跨域访问

4.5 Web端上传组件
- 单文件上传组件
singleUpload.vue
<template>
  <div>
    <el-upload
      action="http://passjava.oss-cn-beijing.aliyuncs.com"
      :data="dataObj"
      list-type="picture"
      :multiple="false" :show-file-list="showFileList"
      :file-list="fileList"
      :before-upload="beforeUpload"
      :on-remove="handleRemove"
      :on-success="handleUploadSuccess"
      :on-preview="handlePreview">
      <el-button size="small" type="primary">点击上传</el-button>
      <div slot="tip" class="el-upload__tip">只能上传jpg/png文件,且不超过10MB</div>
    </el-upload>
    <el-dialog :visible.sync="dialogVisible">
      <img width="100%" :src="fileList[0].url" alt="">
    </el-dialog>
  </div>
</template>
<script>
   import {policy} from './policy'
   import { getUUID } from '@/utils'

  export default {
    name: 'singleUpload',
    props: {
      value: String
    },
    computed: {
      imageUrl() {
        return this.value;
      },
      imageName() {
        if (this.value != null && this.value !== '') {
          return this.value.substr(this.value.lastIndexOf("/") + 1);
        } else {
          return null;
        }
      },
      fileList() {
        return [{
          name: this.imageName,
          url: this.imageUrl
        }]
      },
      showFileList: {
        get: function () {
          return this.value !== null && this.value !== ''&& this.value!==undefined;
        },
        set: function (newValue) {
        }
      }
    },
    data() {
      return {
        dataObj: {
          policy: '',
          signature: '',
          key: '',
          ossaccessKeyId: '',
          dir: '',
          host: '',
          // callback:'',
        },
        dialogVisible: false
      };
    },
    methods: {
      emitInput(val) {
        this.$emit('input', val)
      },
      handleRemove(file, fileList) {
        this.emitInput('');
      },
      handlePreview(file) {
        this.dialogVisible = true;
      },
      beforeUpload(file) {
        let _self = this;
        return new Promise((resolve, reject) => {
          policy().then(response => {
            _self.dataObj.policy = response.data.policy;
            _self.dataObj.signature = response.data.signature;
            _self.dataObj.ossaccessKeyId = response.data.accessid;
            _self.dataObj.key = response.data.dir + getUUID()+'_${filename}';
            _self.dataObj.dir = response.data.dir;
            _self.dataObj.host = response.data.host;
            resolve(true)
          }).catch(err => {
            reject(false)
          })
        })
      },
      handleUploadSuccess(res, file) {
        console.log("上传成功...")
        this.showFileList = true;
        this.fileList.pop();
        this.fileList.push({name: file.name, url: this.dataObj.host + '/' + this.dataObj.key.replace("${filename}",file.name) });
        this.emitInput(this.fileList[0].url);
      }
    }
  }
</script>
<style>

</style>
- 获取签名的JS文件
import http from '@/utils/httpRequest.js'
export function policy () {
  return new Promise((resolve) => {
    http({
      url: http.adornUrl('/thirdparty/v1/admin/oss/getPolicy'),
      method: 'get',
      params: http.adornParams({})
    }).then(({ data }) => {
      resolve(data)
    })
  })
}
- 使用单文件上传组件
使用上传图片组件
<el-form-item label="类型logo路径" prop="logoUrl">
    <single-upload v-model="dataForm.logoUrl"></single-upload>
</el-form-item>

<script>
  import SingleUpload from "@/components/upload/singleUpload" // 引入单文件上传组件
  export default {
    components:{ SingleUpload }
  }
</script>

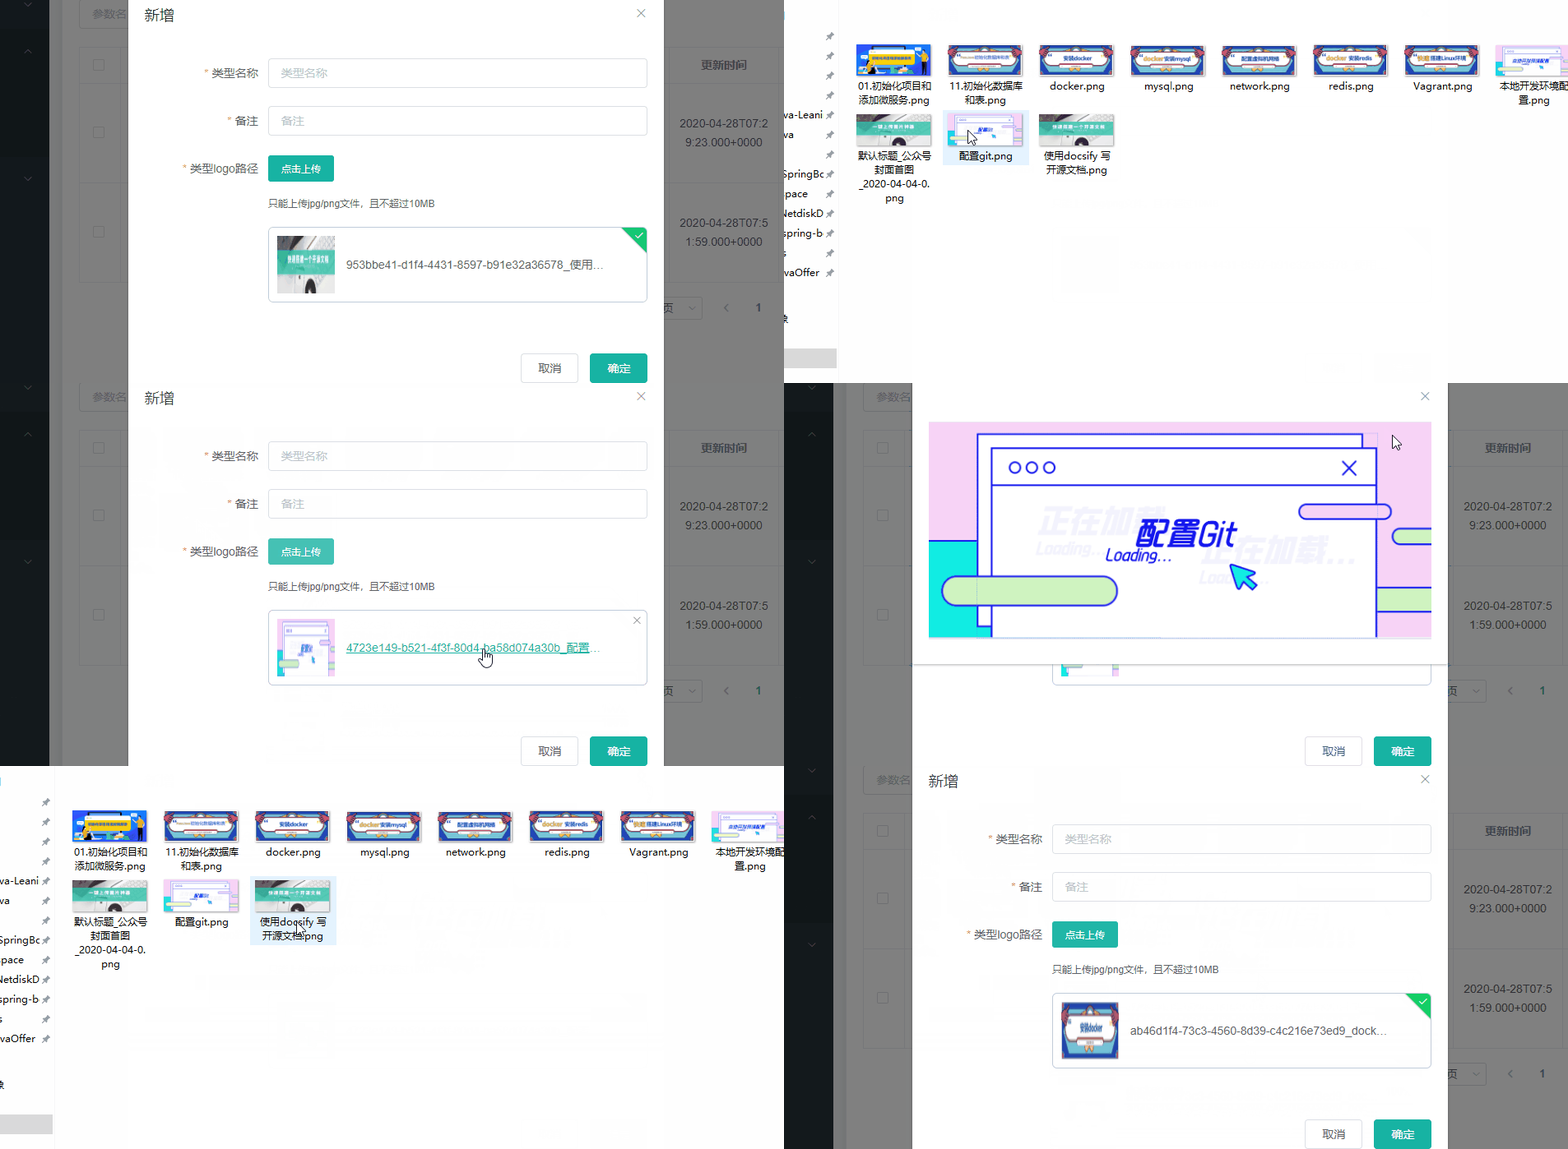
上传文件成功
下节预告
- 数据校验
代码地址
https://github.com/Jackson0714/PassJava-Platform
公众号

Powered by Waline v3.3.0
